Friday 30 December 2011

Download Angry Bird Game Full Pack with Season 1 and 2

Angry Bird my favorite is the biggest hit among every teenager and iPhone freak, Today it come with all mobile OS. Now it is rocking in PC and web browsers.


Angry Bird Season 2 Download

Angry Bird Season 1 Download

Angry Bird RIO Gold Download

Thursday 29 December 2011

Firefox 9 for Android now use it on tablets

Mozilla has announced the arrival of its latest version of Firefox 9, which is optimised for Android tablets.

The Android version of Firefox 9 has a number of new features. These include a new action bar, a veritable banquet of button shortcuts and browser load times have been made that little bit quicker. There's also more HTML5 love than ever before.
`


How to get:
To get Firefox 9 for your tablet, head over to the Android Market now.
Mozilla has kindly created a video to show the browser in action. So, sit back, relax and possibly bring some popcorn.

How to convert Ubuntu into Mac OS X


If you love the Mac interface and you want to get this look onto your ubuntu operating system then here is a simple package that will install the Mac theme ,apps and resources onto your Ubuntu OS.And if you are a  Mac fan and you dont like to leave your Linux OS at the same time,then you can get the look of a Mac OS X using a resource package called Macbuntu.Macbuntu is a awesome package to try out and check out the cool look of Mac OS Xin your Ubuntu for free.
Macbuntu is not a simple theme that changes only icons and stuff,rather this installs all the app resources ,widgets and icons for the Mac interface completely onto your linux system without letting you paying like a Mac OS X and that too for free.So head over to sourceforge and
download Macbuntu  and enjoy the look and feel of a Mac OS X on your linux system.Macbuntu installs a number of applications from Mac OS that include Global Menu, Docky, Ubuntu-Tweak, Cheese, and even the Mac like Login screen.Follow these steps to install macbuntu in your ubuntu system.You can set a lot of options during the installation of the package like logo in the menu bar,window previewer and hot corner.

Installing Macbuntu:here are some simple and detailed steps


Step1) Firstly, grab a copy from the project’s page at SourceForge. download it and right-click the file and press Extract Here.In extracted folder you’ll find a file named “Install.sh”.It’s the installation script. Now double-click it and choose Run in Terminal. 

Step 2) A terminal window should pop up now which looks pretty much like this:


Step 3) Nothing interesting  so just press y and hit enter. Afterwards, the installation will begin with a few questions you need to answer.


Choose whatever answer you want or just hit enter without any letter to choose the default choice. During installation, you may need to download some packages from the internet so please choose yes when asked. Now installation is done, you will be offered to download Mac OS X themes for FireFox, Thunderbird, and Chrome.

If you want to, you can choose yes and browser window will open showing you where to download them. The theme links are provided in the end of this article. Your Ubuntu should have started to look a bit like Mac by now. Last thing to do is restarting. You will be asked to restart, so please choose yes
.

Step 4)After restarting you’ll see that your Ubuntu box looks almost identical to Mac OSX. The boot screen has changed, login screen, desktop, panels, icons, bottom dock, and even the mouse cursor has been changed. Have fun with your new Mac OSX. You can always use a different them without uninstalling Macbuntu. Just right-click on your desktop, click change desktop back ground from the context menu, a window will pop up, choose the themes tab and change the theme.


Uninstalling Macbuntu

If you don’t like Macbuntu or you feel like you don’t want it anymore you can revert your Ubuntu to default state. In the archive you downloaded and extracted there is the file “uninstall.sh” double-click it and choose run in terminal. Continue with the instructions within the terminal window to complete the uninstallation.

iPhone Secert codes and Tricks


  • *3001#12345#* + tap Call. Enter Field Mode. Field mode contains lots of iPhone inner settings, especially newest network and cell information.

  • *#06# Shows your IMEI. No need to tap Call. IMEI is the unique identifier for your mobile phone hardware.

  • *777# + tap Call. Account balance for prepaid iPhone only.

  • *225# + tap Call. Bill Balance. (Postpaid only)

  • *646# + tap Call. Check minutes (Postpaid only).

  • *#21# + tap Call. Set interrogation for call forwards. Discover the settings for your call forwarding. You'll see whether you have voice, data, fax, SMS, sync, async, packet access, and pad access call forwarding enabled or disabled.

  • *#30# + tap Call. Check the calling line presentation. This shows whether you have enabled or disabled the presentation of the calling line, presumably the number of the party placing the call.

  • *#76# + tap Call. Check whether the connected line presentation is enabled or not. State whether the connected line presentation is enabled or disabled. Similar to the calling line presentation.

  • *#61# + tap Call. Check the number for unanswered calls. Show the number for voice call forwarding when a call is unanswered. Also show the options for data, fax, SMS, sync, async, packet access and pad access.

  • *#62# + tap Call. Check the number for call forwarding if no service is available. Just like the previous, except for no-service rather than no-answer situations.

  • *#67# + tap Call. Check the number for call forwarding when the iPhone is busy. And again, but for when the iPhone is busy.

  • *#33# + tap Call. Check for call control bars. Check all the usual suspects (voice, data, fax,SMS, etc) to see whether barring is enabled or disabled for outgoing.

  • *#43# + tap Call. Determine if call waiting is enabled. Shows call waiting status for voice, data, fax, SMS, sync data, async data, packet access and pad access. Each item is either enabled or disabled.

How to run a Symbian application on your computer( make Your Computer WORK AS MOBILE )

Description
The all-in-one Symbian, S60 platform, and S60 device SDKs enable the development of applications using Qt, C++, Java™ technology, and web technology. The SDKs include all the key resources needed for applications development, such as documentation, API reference, examples, and an emulator. An IDE is not included
Follow these steps to run a Symbian application on your computer.

  1. Download Symbian SDK from here.( It's a huge file )
  2. Install the SDK and all chaintools included in the package in their default location.
  3. After all packages are installed, reboot your PC.
  4. Now go to Start » Program files » Nokia Developer Tools » Symbian SDK » Emulator to launch the emulator
  5. Wait for the Emulator to completely load. The Emulator program will look like this when finished loading.


 6.Now inside the Emulator program, go to File » Open and then choose your favorite Symbian applications   that you want to run.


All set, install and enjoy your favorite Symbian apps on your PC. If you get error while installing unsigned applications, goto Menu » Settings » Application settings and change value from Signed only to all.


Add Background Image to Google


There are some third party scripts and sites to enable background image for google.com page. Now the great Google itself introduced a way to add background image to your Google home page.
Procedure is very simple.
  1. Navigate to http://www.google.com/addphoto
  2. Upload a photo or select an existing one

All set good to go now. Hope u like the new background feature.

WebGate Advanced Blocker v2.10.204 Software

Advanced Blocker is an all-in-one solution to help you filter unwanted voice calls, video calls, text messages, MMS and WAP Push messages.

You no longer need to turn off your phone just to avoid interruptions – just enable Advanced Blocker and leave it to the software to filter unwanted and unimportant calls and messages while you enjoy your privacy.


Key features:
· Silent instant reject of all blacklisted numbers, number patterns and text rules
· Auto-start mode – option to automatically start-up AB after phone restart
· Blocking of fixed numbers or groups of numbers (wildcard * number filters)
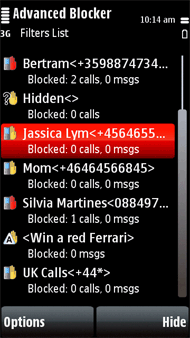
· Discreet activity indicator on the phone’s stand-by screen
· Various contact import options – import from the phone’s log, from phone’s contact book, manual import
· Blocked history log for detailed history of filtered events
· Visual indicators providing instant overview of all new blocked events in the blacklist rules main screen
· Blocked messages can be easily viewed and restored
· Full reject entry log with details screen for each blocked event
· Customizable reject options for blacklisted contacts – you can select what kind of events to accept or reject from each number – calls, SMS, MMS, WAP push messages.

How does it work?
· Create a blacklist rule: to block certain contacts from calling/texting you, you just need to import them in the application. You can import contacts from phonebook, from the phone log and manually. Hidden callers can also be blocked!
· Visual indicator on the stand-by screen monitors AB’s activity and shows you if there are new blocked calls/messages.
· Incoming calls (voice and video) are blocked with a busy tone. Messages (text messages, MMS and WAP push messages) are silently filtered with no sound or light indication.
· Blocked History log shows you all new blocked events.
· Details of each rejected event are logged; blocked messages can be read and restored.
Download WebGate Advanced Blocker v2.10.204 Software

Total Recall v4.1 Software for mobile


Features Include:


* No Beep Recording ** (See notes below)
* Record up to the Limits of your Memory in AMR or WAV formats
* AutoSend Clips via MMS, HTTP* & Email
* Manually or AutoSend Clips via MMS, HTTP* & Email
* Intuitively Named Clips, rename, add notes and more!
* Extremely flexible recording scenarios
* Use as a full featured dictaphone app when not on calls, start recording using a convenient hot key
* Password Protection, Autostart and many more features!


Whats New :
Total Recall v4.10 for Nokia S60 3rd & 5th edition devices. This is a HUGE
update, hardly anything was left untouched:


* Brand new beep suppression technology delivers perfect audio quality on FP2 devices with NO beep (E52, E55, 6710, 5530 and N97 may beep on the device side only at a very low level).
* Entirely new UI
* More intuitive structure, and easier & more extensive options for auto sending recorded clips
* Improved Dictaphone handling with seperate audio format setting
* Universal WAV audio format support
* And way, way too many minor updates, feature enhancements and fixes to list.


Wednesday 28 December 2011

Mobitel MMS Settings For Android

Setting up the handset for Internet


Select Settings.
Select Wireless & networks or Wireless controls (older versions).
Select Mobile networks.
Select Access point names.
Press the Menu, --> New APN
Select enter Name (Mobitel or something). Press ok
APN: mobitel3g or mobitelbb and press OK.
Select, APN type, enter internet or default and press OK.
Other information not necessary.
Press the Menu and select Save.


Setting up the handset for MMS


On the handset, press the Menu key.
Select Settings.
Select Wireless & networks or Wireless controls (older versions).


Select Mobile networks.
Press the Menu, enter Mobitel MMS or something.
APN: wapmms and press OK
Scroll to, and select, Proxy, enter 192.168.050.163 and press OK.
Scroll to, and select, Port, enter 8080 and press OK.
Scroll to, and select, User name, enter Not Required and press OK.
Scroll to, and select, Password, enter Not Required and press OK.
Scroll to, and select, MMSC, http://192.168.050.165 and press OK.
Scroll to, and select, MMS Proxy, 192.168.050.163 and press OK.
Scroll to, and select, MMS Port , 8080 and press OK.
Scroll to, and select, APN type, enter mms and press OK.
Press the Menu and select Save.

Related Posts Plugin for WordPress, Blogger... TwitterFacebookGoogle PlusLinkedInRSS FeedEmail Delicious Digg Stumbleupon Favorites More

Share

TwitterFacebookGoogle PlusLinkedInRSS FeedEmail Delicious Digg Stumbleupon Favorites More